If you’ve been following the AI space for the last few months, you’ve seen OpenClaw everywhere. 355,000 GitHub stars. People automating tasks they used to do manually every day. And if you’ve done any research before jumping in, you’ve probably hit one of two walls: guides that assume you’re spending $200 a month on API credits, or setups running on hardware most people don’t own.
Before you dismiss your current machine or open your wallet, this guide answers the question you’re actually asking: can the PC you already have run OpenClaw usefully, and what does that actually look like in practice?
The short answer is probably yes. The longer answer is what this guide is for.
What OpenClaw actually is, in one paragraph
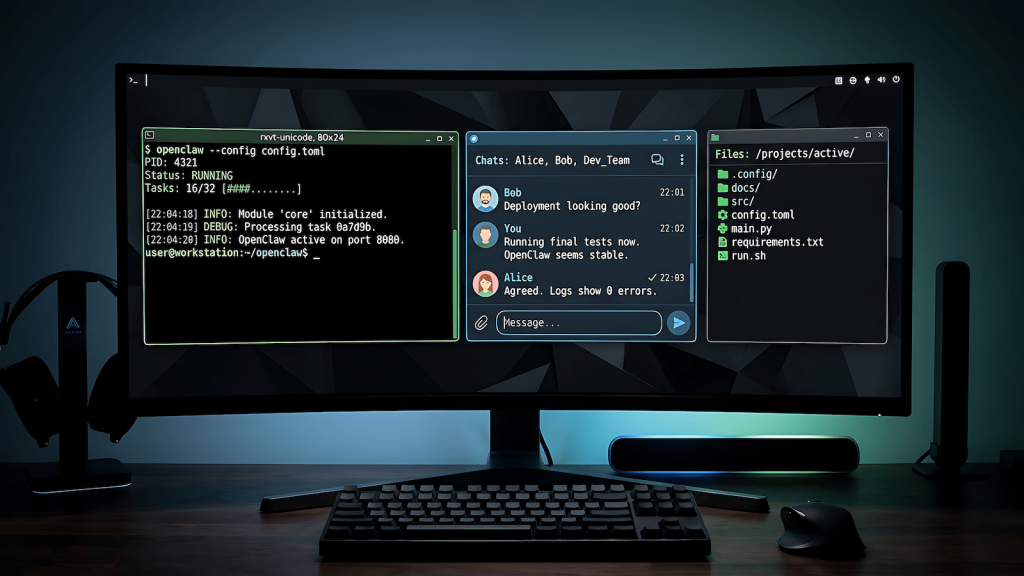
OpenClaw, formerly Clawdbot then Moltbot before legal naming conflicts forced the rebrand, is an open-source AI agent that runs on your machine and connects to messaging apps you already use. You give it tasks through Telegram, Discord, WhatsApp, or whatever you prefer, and it actually does things: manages files, runs shell commands, browses the web, posts content, and orchestrates workflows. It’s not a chatbot you visit in a browser tab. It runs in the background, connected to your system, waiting for instructions or running on a schedule. The LLM you connect to it is the brain. OpenClaw itself is the hands.
Who this guide is for, and who it isn’t
This guide is for you if you’re running a mid-range Windows PC, you want to use OpenClaw for something practical like content workflows, social media posting, or site management, and you want to do it with a local model so there’s no ongoing API cost.
It’s not for you if you need OpenClaw running 24 agents simultaneously on 200GB models or you’re building enterprise automation. That’s a different problem with a different price tag. But if your use case is running a content operation, automating repetitive posting tasks, and getting your sites more visibility, you don’t need specialized hardware to get started.
What you actually need to run it
OpenClaw itself is surprisingly light. The agent runtime uses 300 to 500MB of RAM. Add overhead for your OS, your messaging channel connections, and some headroom, and you’re looking at 2 to 3GB total just for OpenClaw. That’s nothing.
The weight is the model. OpenClaw needs an LLM to think with, and that’s where your hardware actually matters. The threshold for OpenClaw specifically is lower than what you’d need for serious local LLM inference benchmarking, because the workload is different. Background agent tasks, scheduled content briefs, file management, those don’t need 40 tokens per second. They need the model to respond correctly. Speed is secondary.
For a machine running an i7 8th gen or equivalent Ryzen 7, 16GB of system RAM, and a GTX 1660 or better with 6GB VRAM, here’s the honest picture. OpenClaw runs fine. A Q4 quantized 7B model fits within 6GB VRAM on a Turing architecture card like the 1660, which handles CUDA compute without tensor cores. It’s not the fastest inference setup and it’s not a gaming benchmark, but for background agent work it’s enough. If you’re on a Pascal card, a GTX 1070 or 1080, the architecture is a different story despite the VRAM numbers, and you’ll want to read the GPU tier breakdown on EAI before assuming it works the same way.
If you want the full picture of what your GPU can handle for local inference generally, that GPU guide covers every VRAM tier with honest architecture caveats. If you want to know what to buy if you’re building or upgrading specifically for this workload, the PC build guide on HobbyEngineered covers three tiers with specific component recommendations.
For this guide, the baseline is what you already have. That’s the point.
Installing OpenClaw on Windows
OpenClaw runs on Node.js. Before anything else, make sure you have Node.js 22.14 or higher installed. The project recommends Node 24 but 22.14 works fine for most setups. Check your version with node --version in your terminal. If you need to install or update, grab it from nodejs.org.
Once Node is sorted, open a terminal and run:
npm i -g openclaw
That’s the full installation. OpenClaw is a global npm package. Once it’s installed, run:
openclaw
This starts the first-time setup wizard. It’ll walk you through creating your first identity, which is essentially the persona and configuration your agent runs under, and connecting your first messaging channel. You can skip channels you don’t need and add them later.
For Windows users specifically: run your terminal as administrator for the initial install. Permissions issues are the most common reason the install fails on Windows, and administrator mode fixes almost all of them.
After setup, your OpenClaw gateway runs at localhost:18789. Keep this in mind because you’ll need it when connecting your local model.
Connecting a local model via Ollama instead of paying for API
This is the step most guides skip because they assume you’re using Claude or GPT. You’re not, and you don’t need to.
First, install Ollama if you haven’t already. Grab it from ollama.com. Once installed, pull a model that fits your hardware. For 16GB RAM and a 6GB VRAM GPU, Llama 3.1 8B at Q4 quantization is the right call. If you want to understand why Q4 is the right default and what the tradeoffs look like at other quantization levels, LLM quantization explained covers that without requiring a math degree.
ollama pull llama3.1:8b
Ollama runs a local API server at localhost:11434. OpenClaw can connect to any OpenAI-compatible endpoint, and Ollama exposes exactly that. In your OpenClaw config, set the LLM type to openai-compatible and point base_url to http://localhost:11434/v1. Set the model name to match what you pulled.
Your openclaw.json LLM block should look like this:
json
{
  "llm": {
    "name": "local-ollama",
    "type": "openai-compatible",
    "base_url": "http://localhost:11434/v1",
    "model": "llama3.1:8b",
    "timeout_ms": 60000
  }
}
The timeout is set higher than default because local inference is slower than cloud APIs. 60 seconds gives the model enough time to respond on modest hardware without the agent throwing a timeout error mid-task.
Once this is configured, restart your OpenClaw gateway and send it a test message through your connected channel. Ask it something simple: “What’s today’s date?” If it responds, your local model is connected and working. If it times out, check that Ollama is running with ollama serve in a separate terminal first.
For a deeper look at what’s happening under the hood when your local model processes that request, what is llama.cpp explains the actual inference engine Ollama is running on. Understanding that layer also tells you why the GTX 1660 works for this use case even without tensor cores, and where the real ceiling is if you want to push further.
If you’re comparing Ollama against other local LLM tools before committing to this setup, Ollama vs GPT4All vs local LLMs breaks down what’s actually different between them.
Your first task: something real, not a demo
Most getting started guides have you ask your agent to set a timer or tell you a joke. That’s not useful. Here’s a first task that actually tests whether your setup is working the way you need it to.
Send OpenClaw this through your connected messaging channel:
“Search the web for the top three trending topics in AI tools this week, summarize each one in two sentences, and save the results to a file called trends.md on my desktop.”
This single task tests web search, reasoning, file system access, and output formatting all at once. If it completes this without errors, your setup is solid. If it gets stuck on web search, you may need to add a search skill. OpenClaw has a skill registry you can browse at openclaw.ai/skills. The web search skill is one of the most commonly installed and it’s a straightforward terminal command to add.
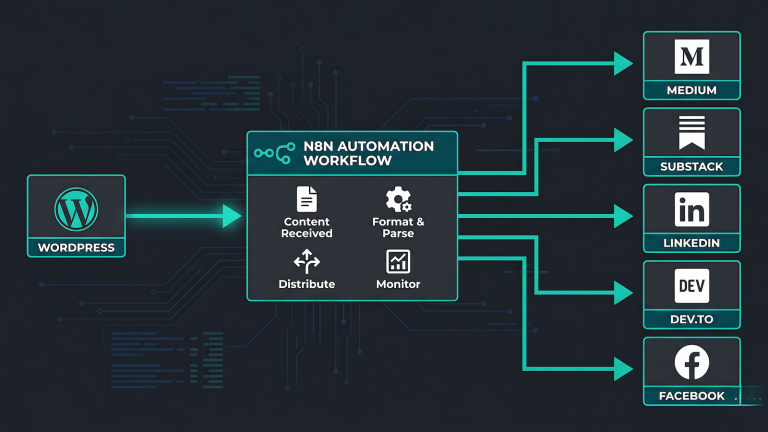
First project: using OpenClaw for content and social media workflows
This is where OpenClaw stops being a demo and starts being useful for a content operation.
The core idea is standing orders. OpenClaw supports persistent instructions that run on a schedule or trigger on conditions. For a content network, the most immediately useful standing order is a daily content brief: pull trending topics from your niche, summarize what’s worth writing about, and deliver it to your Telegram or Discord every morning before you start work. No API cost, no subscription, just your local model doing the research pass you’d otherwise do manually.
To set this up, create a standing order in your OpenClaw config that runs at a set time each morning, searches for recent discussions in your target topics, filters for genuine signal over noise, and formats the output as a brief you can act on. For a QA and AI tools audience, that means monitoring subreddits like r/LocalLLaMA, r/MachineLearning, and r/softwaretesting, plus relevant Hacker News threads, and surfacing anything worth responding to or writing about.
The second useful project is cross-posting. If you have content going out on Substack and you want a summary posted to your Discord or Telegram community, OpenClaw can handle that trigger automatically. New post goes live, OpenClaw detects it via RSS or file watch, drafts a short summary, and posts it to your channel. That’s a workflow that would otherwise eat 10 minutes per post, every post, forever.
Browser-based social posting to platforms like LinkedIn and Facebook is technically supported but treat it as a separate project. It works, but it’s the most brittle part of the current OpenClaw build. Get the file system and messaging workflows stable first, then layer in browser automation once you know your base setup is solid.
What works, what’s still rough, and what to expect
OpenClaw on modest hardware with a local model is genuinely useful but it’s not magic and it’s not finished. Here’s the honest picture after getting it running.
What works well: file management, web search with the right skill installed, messaging channel integration, and standing orders for scheduled tasks. These are stable and reliable on the current build.
What’s still rough: browser automation is the weakest link. It works in controlled conditions but breaks often in production, especially on sites with aggressive bot detection. Don’t build your core workflow around it on day one. Treat it as experimental and build everything else first.
What to expect on your hardware: 8 to 15 tokens per second on a local 7B model means task completion is measured in seconds to minutes, not milliseconds. For background tasks that run while you’re doing other things, that’s completely fine. For anything that needs a fast response in real time, you’ll feel the hardware ceiling. That’s not a failure of the setup, it’s the honest tradeoff of running local and free.
The ceiling is real but so is the floor. Zero ongoing cost, your data stays on your machine, and the use case you defined, running a content operation without paying per token, is fully achievable on what you already have.
When you’re ready to remove the ceiling, the PC build guide on HobbyEngineered is where that conversation starts.